TimeKeeper Grandmaster
This section of the Grandmaster documentation will just focus on managing the device - from initial setup to applying updates. For data on individual features, please refer to the section on that feature.
TimeKeeper Grandmaster setup
Connect a GPS antenna to the female SMA GPS (Grandmaster Generation 2) or BNC (Grandmaster Generation 1) connector on the back of the device (see photos below). The GPS receiver provides 5v DC to the antenna.
Connect a network cable to the first RJ45 ethernet port (eth0 in photos) and navigate with a web browser to 192.168.1.1. You can log in with account “admin” and password “timekeeper” (Note: In earlier versions of TimeKeeper the default password was “fsmlabs”) to configure the network ports, TimeKeeper mode and options. Change the admin user’s default password immediately for security, please. If this is an upgrade and you have been using previous versions of the Grandmaster GUI, it is recommended that you force a full page reload (Ctrl-Shift-R on many browsers). This will make sure your browser loads the latest web interface from the Grandmaster and provides all of the latest features.
To change network interface addresses navigate to the Configuration tab and then Networking subtab, select the options you would like then click Save network changes and then Restart Network to apply the updates. The changes will take a moment to apply after which you can reconnect to the newly configured address.
By default (and as shipped) the Grandmaster does not enable SSH access. That can be enabled through the web interface, however. Please see below for details on enabling additional access methods.
The device will then synchronize with the GPS and once done will answer NTP queries and provide PTPv2 service on the default domain (domain 0) on all network interfaces. The GPS startup process can take up to 15 minutes in some cases. You can monitor progress on initialization via the Status tab in the web GUI.
No further configuration of the server should be necessary.

Grandmaster Generation 1
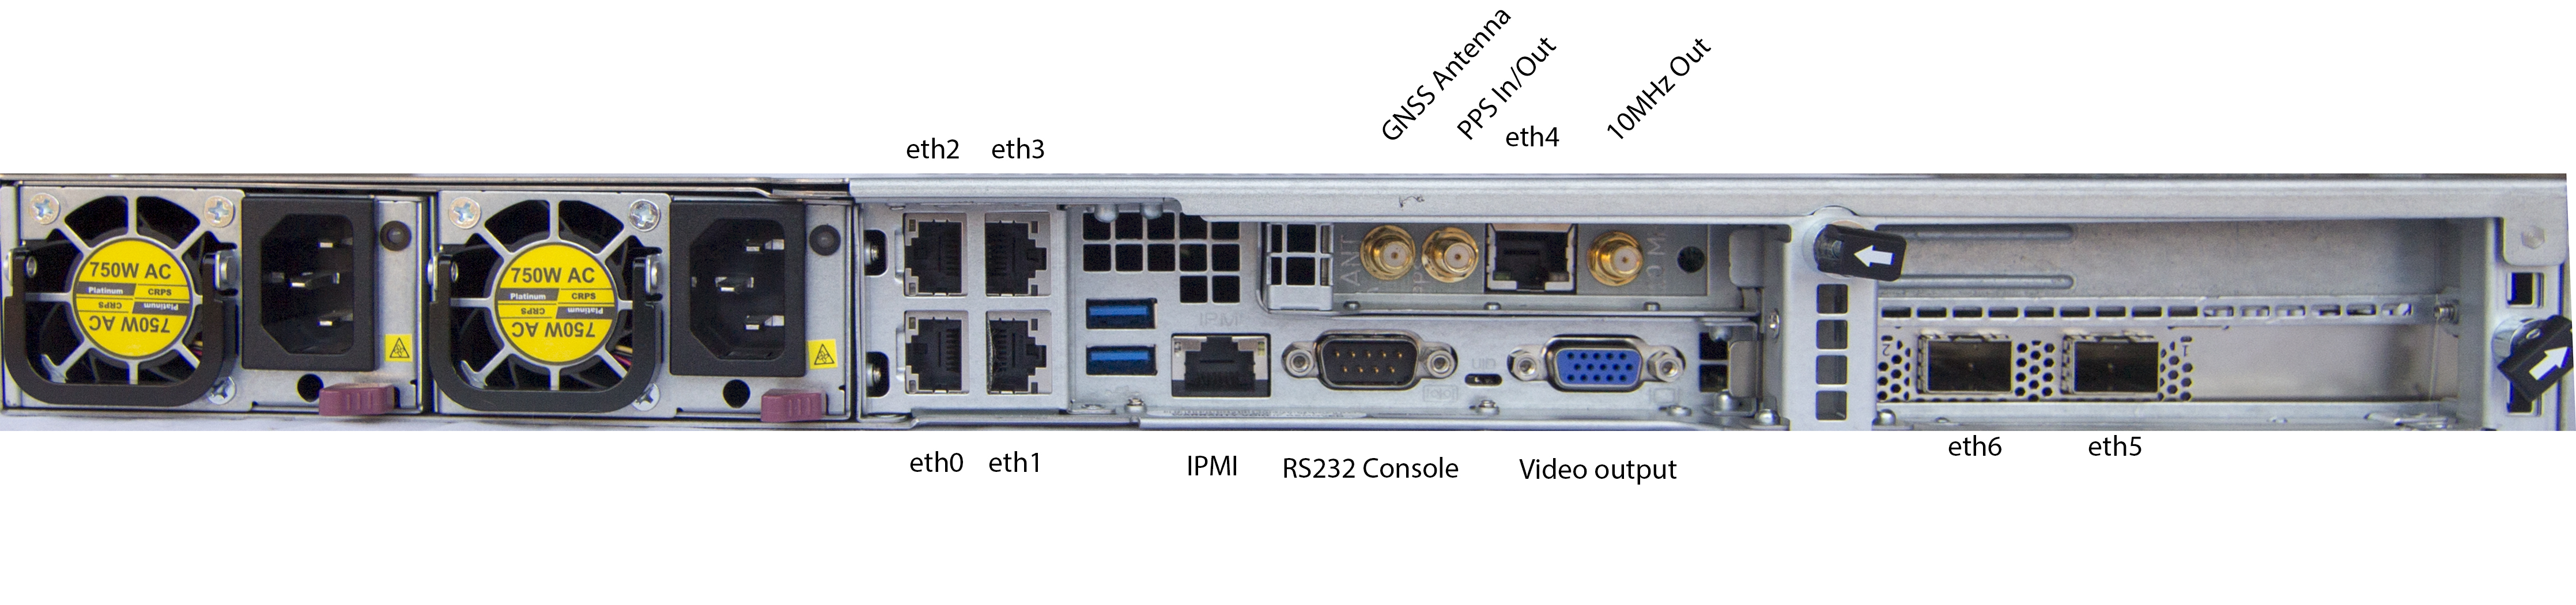
Grandmaster Generation 2
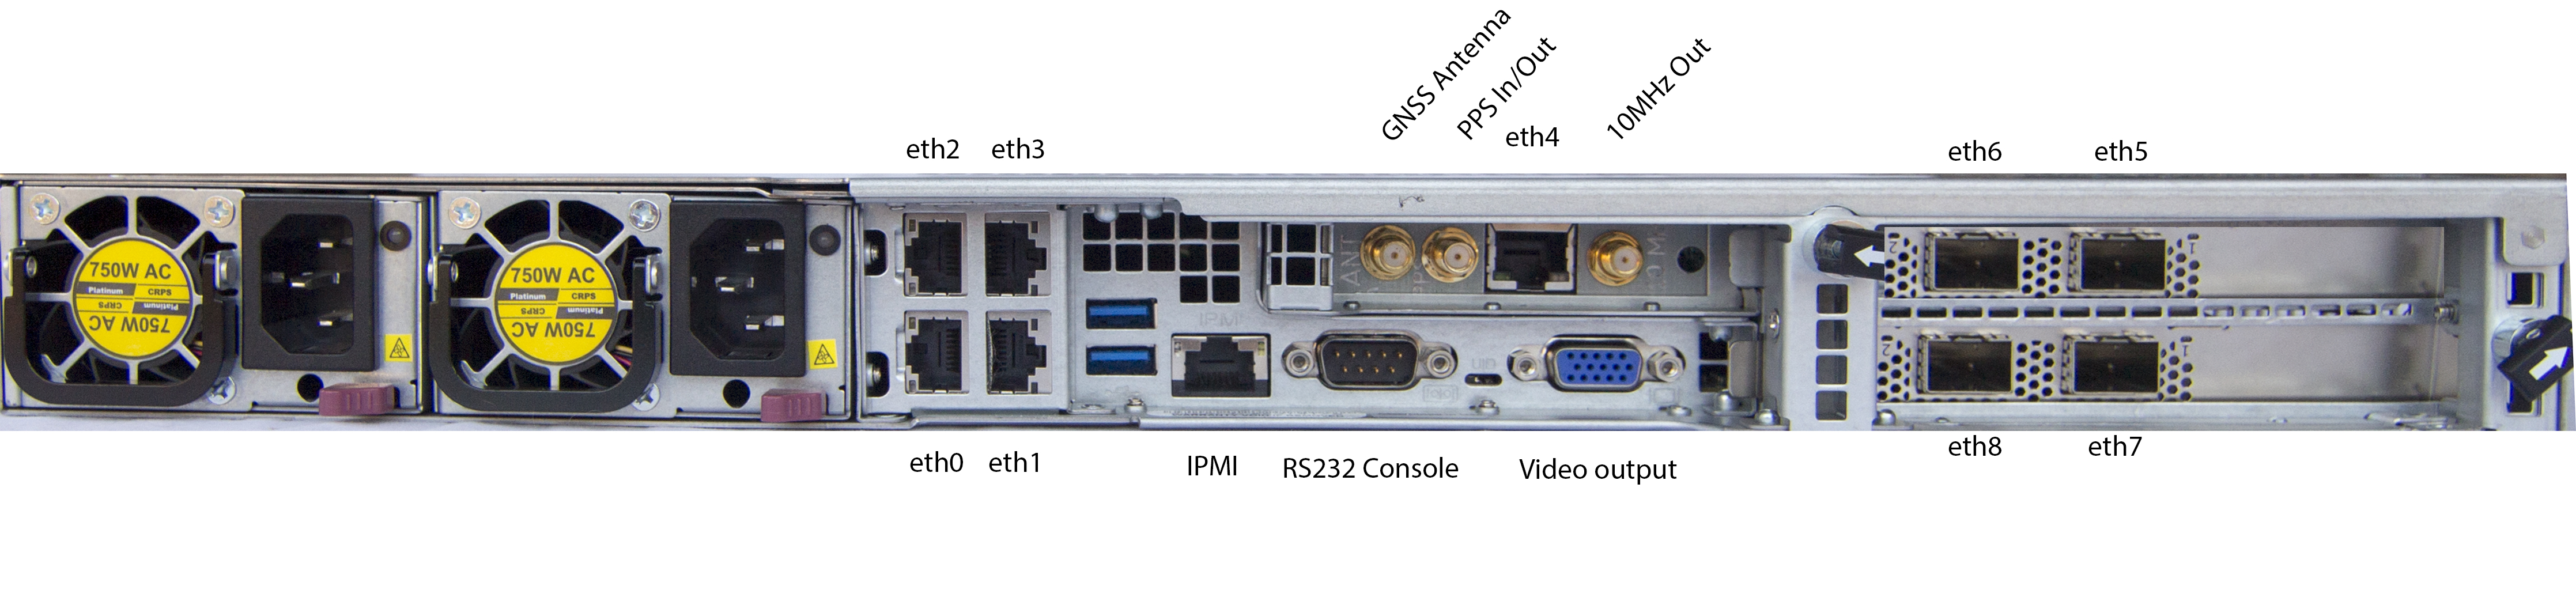
Grandmaster Generation 2 with Additional Network Interfaces
Shipped network configuration
Each network port is configured with a unique static IP address when shipped. eth0 is configured for 192.168.1.1, eth1 for 192.168.2.1, and so on. This includes optional 10G SFP+ ports which are eth5 (192.168.6.1), eth6 (192.168.7.1), etc.
Please note, the TimeKeeper Grandmaster does not support having multiple network interfaces on the same subnet or multipath routing, and does not support netmasks more restrictive than /30 (255.255.255.252) to avoid common routing issues.
Modifying the server configuration by changing the console ports, otherwise modifying the Linux kernel, BIOS settings, installed devices or installed software applications may cause problems in performance or correctness. This can create support issues beyond FSMLabs' support obligations. Please contact support@fsmlabs.com before attempting to make any changes to the server software or hardware configuration.
Upgrading TimeKeeper Grandmaster hardware
The following steps describe how to upgrade via the web interface. In addition to TimeKeeper, you can also upgrade the basepackage, which is a set of components that upgrade the Grandmaster platform and provide new features for TimeKeeper to use. Please note, however, that when updating TimeKeeper and the basepackage on a hardware Grandmaster, TimeKeeper must be upgraded first, followed by the basepackage.
- Download the installer for the current release from FSMLab’s website
- Log in to the web interface (see the “Web interface authentication” section for details)
- Click on the “Configuration tab” on your GM
- Click on the “Update” tab under that
- Click “Update TimeKeeper install”
- Click “Choose File”
- Navigate to and select the installer you downloaded in step 1
- Wait about 20 minutes while the system reboots twice to complete the upgrade process
- Log back in to the web interface
- Confirm via the “Status” tab that it has the right version
- If you also want to install the basepackage, repeat except click “Update TimeKeeper base package” in step 5
RAID alerting and recovery
TimeKeeper Grandmasters have built in RAID support, and the state of the RAID will be reported on the status page of the TimeKeeper web GUI. If configured, TimeKeeper will also send alarms about disk failure and recovery through the normal configured alerting methods - syslog, email, SNMP, detailed in the section, “Alerting - Log files, SNMP, syslog, email, Windows event log.” Alarms will also be sent if the S.M.A.R.T. diagnostics of a disk reports that it may fail.
In the event of a disk failure, the Grandmaster will emit periodic alarms until the failed disk is replaced, but will continue operating. Once the failed disk is replaced, a reboot is required in order to initiate reconstruction of the RAID array.
Managing Grandmaster systems
TimeKeeper Grandmaster systems can have some of their settings saved, set, and restored
with the tkctl tool. tkctl can also be used to change individual settings directly
on the command line.
To use tkctl log in on the console or through ssh:
tkctl -h
All current Grandmaster settings can be printed with this command, as the admin user:
tkctl -a
Redirect this output to a file to save the current grandmaster settings:
tkctl -a > /tmp/tkgm_settings.tkctl
This file can be saved externally as a backup of the system state and modified if needed to reflect intended settings. This file can be applied with the -l option:
tkctl -l /tmp/tkgm_settings.tkctl
Settings are applied in the order they’re defined in the file. For example, if a line specifies the IP address of a VLAN interface, that VLAN interface must already be created so any line needed to create the device should be specified first. More detail on device creation is listed below.
These steps of saving off the configuration and applying the saved configuration can also be done with the web interface, under the Configuration tab, subtab Service and System Management. The section Configuration Management has an option to download and save the current configuration and also one to upload an existing configuration file to have it applied.
Individual settings can also be set or retrieved, like this to get the IP address set for eth0:
tkctl -g gm.network.devices.eth0.ipaddr
or to set it:
tkctl -s gm.network.devices.eth0.ipaddr=10.45.220.31
tkctl options
tkctl controls 2 different types of behavior on TimeKeeper Grandmasters - settings and
actions. Settings are individual feature configurations like network options. Actions
are steps involving an action and may relate to a setting, like restarting the network
to apply configuration changes recently made. Here’s an example where you set the
configuration for eth0, then restart the network in order to make that setting
active:
tkctl -s gm.network.devices.eth0.ipaddr=10.45.220.31
tkctl -s gm.network.devices.eth0.netmask=255.255.255.0
tkctl -s gmaction.restart=gm.services.network
Or similarly a bond device can be created/configured/deleted:
tkctl -s gmaction.create=gm.network.devices.bond0
tkctl -s gm.network.devices.bond0.ipaddr=10.45.220.31
tkctl -s gm.network.devices.bond0.netmask=255.255.255.0
tkctl -s gm.network.devices.eth5.slave=1
tkctl -s gm.network.devices.eth5.master=bond0
tkctl -s gm.network.devices.eth7.slave=1
tkctl -s gm.network.devices.eth7.master=bond0
tkctl -s gmaction.delete=gm.network.devices.bond0
Here are the list of names/settings supported by tkctl and can be set (with
-s) if applicable or retrieved (with -g). A setting that isn’t present or
doesn’t have a value set may not be listed when using tkctl -a. If tkctl -g is used to query a setting that isn’t present, an empty value
may be printed in addition to the expected values specified below.
- gm.type - The type of GM (readonly).
- gm.serial - The serial number of the GM (readonly).
- gm.config.timekeeper1 - The TimeKeeper config file to be used, specifically the /etc/timekeeper.conf contents, base64 encoded.
- gm.config.ntpkeys2 - The NTP keys to be used, base64 encoded.
- gm.config.relayhost2 - A host to be used to relay email alerts through.
- gm.config.maxlogage2 - A numeric value indicating how many days to retain logs for.
- gm.services.sshd.enabled2 - 1 or 0, indicates whether SSH is enabled for remote login.
- gm.services.sshd.listenaddress.{1,2,3}2 3 - An IP address that should answer SSH queries.
- gm.services.snmpd.enabled2 - 1 or 0, indicates whether SNMP querying is enabled.
- gm.services.snmpd.communitystring2 - A base64 encoded string representing the community string to be used for SNMP queries.
- gm.services.syslog.{1,2,3}.host2 3 - Hostname/IP address of the first, second, or third configured remote syslog host.
- gm.services.syslog.{1,2,3}.port2 - The numeric port to be used for remote syslog communication for the first, second, or third server.
- gm.services.syslog.{1,2,3}.protocol2 - The protocol used to reach the specified remote syslog server - TCP or UDP.
- gm.services.syslog.{1,2,3}.highprecision2 - 1 or 0, indicates whether to include high- or low-precision timestamps, respectively.
- gm.auth.tacacs.enabled2 - 1 or 0, indicates whether TACACS+ is enabled for authentication (if present).
- gm.auth.tacacs.{1,2,3}.host2 3 - Hostname/IP address of the first, second, or third configured TACACS+ server.
- gm.auth.tacacs.{1,2,3}.secret2 - A base64 encoded secret to be used to communicate with the identified TACACS+ server. This can only be set, not retrieved, and is recommended to be loaded from a file rather than set interactively.
- gm.auth.radius.enabled2 - 1 or 0, indicates whether RADIUS is enabled for authentication (if present).
- gm.auth.radius.{1,2,3}.host2 3 - Hostname/IP address of the first, second, or third configured RADIUS server.
- gm.auth.radius.{1,2,3}.secret2 - A base64 encoded secret to be used to communicate with the identified RADIUS server. This can only be set, not retrieved, and is recommended to be loaded from a file rather than set interactively.
- gm.auth.radius.{1,2,3}.timeout2 - Timeout in seconds for the first, second, or third configured RADIUS server.
- gm.users.root.enabled2 - 1 or 0, indicating whether the root user can log in via SSH.
- gm.users.{admin,readonly,loguser}.password2 - A base64 encoded password to be used for the user. This can only be set, not retrieved, and is recommended to be loaded from a file rather than set interactively.
- gm.users.{readonly,loguser}.enabled2 - 1 or 0, indicating whether the user is enabled. The user must have a password set in order to be enabled.
- gm.network.hostname4 - The current hostname for the grandmaster.
- gm.network.dns.04 3 - The primary DNS server the grandmaster will use.
- gm.network.dns.14 3 - The secondary DNS server the grandmaster will use.
- gm.network.gateway4 - The default gateway the grandmaster will use.
- gm.network.rt_tables4 - A base64 encoded string representing the global route table names.
- gm.network.devices.ethX4 - A list of settings relevant to each ethernet device present. The number of entries will vary by configuration. Valid settings include:
- gm.network.devices.ethX.enabled - 1 or 0, indicates whether the device will be used or not.
- gm.network.devices.ethX.dhcp - 1 or 0, indicates whether the device will get address details through DHCP.
- gm.network.devices.ethX.ipaddr - A valid IP address to be used for the device.
- gm.network.devices.ethX.netmask - A valid network mask to be used for the device.
- gm.network.devices.ethX.slave - 1 or 0, set to 1 if it’s a member of a bonded interface.
- gm.network.devices.ethX.master - The name of the bond device this device is a member of, if relevant. Requires ethX.slave=1 to previously be set.
- gm.network.devices.ethX.descr - A string used to describe the interface for easier management.
- gm.network.devices.bondX4 - A list of settings relevant to each bond device present. The number of entries will vary by configuration. Valid settings include:
- gm.network.devices.bondX.enabled - 1 or 0, indicates whether the device will be used or not.
- gm.network.devices.bondX.dhcp - 1 or 0, indicates whether the device will get address details through DHCP.
- gm.network.devices.bondX.ipaddr - A valid IP address to be used for the device.
- gm.network.devices.bondX.netmask - A valid network mask to be used for the device.
- gm.network.devices.bondX.descr - A string used to describe the interface for easier management.
- gm.network.devices.devX/Y4 - A list of settings relevant to each VLAN device present for VLAN Y, tied to a specific ethernet or bond interface (devX). The number of entries will vary by configuration. Valid settings include:
- gm.network.devices.devX/Y.enabled - 1 or 0, indicates whether the device will be used or not.
- gm.network.devices.devX/Y.dhcp - 1 or 0, indicates whether the device will get address details through DHCP.
- gm.network.devices.devX/Y.ipaddr - A valid IP address to be used for the device.
- gm.network.devices.devX/Y.netmask - A valid network mask to be used for the device.
- gm.network.devices.devX/Y.descr - A string used to describe the interface for easier management.
- gm.network.devices.devX/Y.rule - A base64 encoded string representing the device specific Linux rules for this interface.
- gm.network.devices.devX/Y.route - A base64 encoded string representing the device specific Linux routes for this interface.
- gm.network.devices.ipmi4 - A list of settings relevant to the IPMI. Valid settings include:
- gm.network.devices.ipmi.dhcp - 1 or 0, indicates whether the IPMI will get address details through DHCP.
- gm.network.devices.ipmi.ipaddr - A valid IP address to be used for the IPMI.
- gm.network.devices.ipmi.netmask - A valid network mask to be used for the IPMI.
- gm.network.devices.ipmi.gateway - The default gateway the grandmaster will use for the IPMI.
A number of options can be taken using a ‘set’ using the gm.delete name to remove a name/setting. This can be done as above with a command like:
tkctl -s gmaction.delete=X
where X is the value to be cleared or removed. Names that allow deletions include:
- gm.services.sshd.listenaddress.{0,1,2}3 - This deletes the specified address that SSH is configured to accept queries on.
- gm.services.syslog.{1.2.3}.host3 - 1, 2, or 3 indicates the configured syslog server entry to delete. Similarly, the syslog entry can be removed by setting the syslog host’s value to an empty string.
- gm.auth.tacacs.{1.2.3}.host3 - 1, 2, or 3 indicates the configured TACACS+ server entry to delete. Similarly, the TACACS+ entry can be removed (including the configured secret) by setting the entry’s host value to an empty string.
- gm.auth.radius.{1.2.3}.host3 - 1, 2, or 3 indicates the configured RADIUS server entry to delete. Similarly, the RADIUS entry can be removed (including the configured secret and timeout) by setting the entry’s host value to an empty string.
- gm.network.devices.bond - Where the bond named is bond0, bond1, bond2, etc. This deletes a configured bond device
- gm.network.devices.ethX/YY - Where the ethernet/VLAN device named is eth3/44 for VLAN 44 on eth3 for example. This deletes the configured VLAN on the named ethernet device.
- gm.network.devices.dev.rule - This deletes the configured custom Linux rules for the named device.
- gm.network.devices.dev.route - This deletes the configured custom Linux routes for the named device.
- gm.network.dns.{0,1}3 - This deletes the configured first or second DNS server.
Here are a list of sample actions possible:
- gmaction.restart=gm.services.timekeeper - Restarts TimeKeeper only.
- gmaction.restart=gm.services.network - Restarts the network (and TimeKeeper).
- gmaction.restart=gm.services.syslog - Restarts the syslog service.
- gmaction.restart=gm.services.sshd - Restarts the sshd service.
- gmaction.restart=gm.hardware - Restarts/reboots the Grandmaster.
- gmaction.restart=gm.hardware.gnss - This should be used after any GPS/GNSS antenna connections have been modified or disconnected and reconnected. This also restarts TimeKeeper.
- gmaction.reload=gm.services.timekeeper - Reloads verbose settings in configuration file without restarting TimeKeeper.
- gmaction.powercycle=gm.hardware - Hard power cycles the Grandmaster.
- gmaction.stop=gm.services.timekeeper - Stops the TimeKeeper service temporarily.
- gmaction.stop=gm.hardware - Shuts the Grandmaster down and powers it off.
- gmaction.delete=gm.services.sshd.listenaddress.3 - Delete the 3rd configured ssh listen address.
- gmaction.create=X - Creates named device, either a bond or VLAN as described above. An example is gmaction.create=gm.network.devices.eth2/33 to create VLAN device eth2.33 tied to eth2. Does not report an error if the device already exists.
- gmaction.delete=X - Deletes named device, either a bond or VLAN as described above. An example is gmaction.delete=gm.network.devices.eth2/33 to delete VLAN device eth2.33 on eth2.
- gmaction.trigger=testalert - Causes TimeKeeper to log and send a test alert over all configured mechanisms (SNMP, syslog, email).
These operations are reported over syslog along with some additional events in order to provide records of changes made over time by different users. Please refer to the alerting documentation for details on what these alerts look like and how they’re transmitted.
Note: tkctl -a does not include deletions of any deletable settings (see gmaction.delete above)
including SSH listen addresses, syslog servers, RADIUS/TACACS+ servers, bonds, VLANs, routes, and
rules. That means, upon using tkctl -l to load a backup saved with tkctl -a, you will end
up with a union of the old and new configurations with respect to these settings. If you don’t
want this union, be sure to delete these settings before restoring from the backup file. You
can do this from the web interface or with the tkctl command, e.g.,
tkctl -s gmaction.delete=gm.auth.radius.3.host
tkctl -s gmaction.delete=gm.auth.radius.2.host
tkctl -s gmaction.delete=gm.auth.radius.1.host
Similarly, tkctl -a includes settings for any configured bonds and VLANs, e.g.,
gm.network.devices.bond0/1.enabled = 1, but it does not first create those bonds or VLANs. To
prevent tkctl -l from failing, be sure to first create any bonds and VLANs referenced in the
backup file before loading it. You can do that from the web interface, via the tkctl -s
command, or by adding creation settings to the configuration file,
e.g.,
gmaction.create=gm.network.devices.bond0
gmaction.create=gm.network.devices.bond0/1
for the above case.
Quick steps for Grandmaster replacement
A common use of tkctl is to save and restore entire Grandmaster
configurations. Saving the configuration is important to provide continual
backups of the entire Grandmaster configuration in case of failure. Restoring
the configuration with tkctl is helpful when there’s been an inadvertent
change, or when an existing Grandmaster needs to be replaced with a new unit
running the same configuration.
To recap, a Grandmaster’s current configuration can be saved off in a file with:
tkctl -a > /tmp/gm_config
from the command line, or from the web interface select Configuration tab, subtab Service and System Management and click Save Grandmaster configuration to download the current settings as a file.
Once this file is in hand it can be applied to a new GM to get it up and running as a replacement in production, or as an identically configured unit to be used in test. This is done at the command line with:
tkctl -l /tmp/gm_config
from the command line, or from the web interface select Configuration tab, subtab Service and System Management and click Apply Grandmaster configuration file to upload and apply the existing file.
When using the web interface, the upload will also trigger a restart of both the network
and TimeKeeper automatically. The tkctl command line interface will leave that step
for the user. To make sure all settings are applied follow the tkctl load step above with:
tkctl -s gmaction.restart=gm.services.network
Alternatively, the provided configuration file could have gmaction.restart=gm.services.network included as the last line to automatically restart both the network and TimeKeeper.
Footnotes
-
This takes effect after restarting TimeKeeper. Verbose settings also take effect after reloading TimeKeeper. ↩︎
-
Changes here take effect immediately ↩︎
-
The numbers refer to list position, not array index. Only matters when using -s to add or delete entries. ↩︎
-
This takes effect after restarting the network (this also restarts TimeKeeper) ↩︎